Although I used Python a long time and OOP, I never really dwelled into the reasons that someone would use super instead of other ways in Python. Usually I would use other ways in an effort do avoid confusing words and those ugly underscores. Sometimes however it is worth making something a bit less readable and such a case is super.
Why should you learn to use super though? For a single reason.. super equals less headaches.
Calling a parent class’ initializer
Remember that with initializer I merely mean the __init__ method of a class. So let’s take for example the class A below.
class A(object):
  def __init__(self):
    print('This is A')
  def hello(self):
    print('Hello, this is a method from A')
When we instantiate this class, the initializer runs and thus we get printed ‘This is A’. Now we want B to inherit A:
class B(A):
  def __init__(self):
    print('This is B')
The result is a hybrid class – half A, half B. The problem is that both classes have an initializer and in such cases the hybrid’s methods, variables, etc. are preferred. So in practice B has the method hello that it inherited from A but will only run its own initializer.
In real life we tend to run the initializer for every parent class. This is simply because of how program designs tend to be. In our simple example a way to solve this is to explicitly call the initializer of A:
class B(A):
  def __init__(self):
    A.__init__(self)
    print('This is B')
The self always makes me dizzy so I will explain a bit on it. Namely why can’t we just have A.__init__()? The reason is that A is not an instance but a class. self however is an instance and that’s why we use it. As you might have noticed though, it is an instance of B and still we pass it to A as if it was an instance of A. So why the hell does it work?
The reason it works is that as we said B is a hybrid – half A, half B. This is very similar to having a double citizenship. A half Greek, half Norwegian can be recognized in both Greece and Norway. In the same way A and B can be recognized as either A or B. Logical, aye?
The bless of not knowing
The above example works fine. But what if one changes the name of A into G? For a simple example like ours, we could just change every occurence of A into G. However if you are dealing with medium to large projects you might have many classes that inherit from A and way many files. Furthermore if you have tests, you probably have all sort of test classes that inherit as well.
The point is that in such cases a little change somewhere can invoke havoc. The programmer will need to keep track of every single place where we inherit class A which just is not practical. That’s where super comes into play.
With super we can call A’s initializer without ever typing the name of the class:
class B(A):
  def __init__(self):
    super(B, self).__init__() # notice we type B, not A
    print('This is B')
Now, no matter if you rename A to G or V, you won’t have to make any changes to classes that inherit from that class!
The bless of caring even less
So you saw how super takes away the problem of having to keep track of class names we inherit from. I think all this makes much more sense when we inherit from multiple classes.
Say we have classes X and Y:
class X(object):
  def __init__(self):
    print('This is X')

class Y(object):
  def __init__(self):
    print('This is Y')
Now if B inherit from everyone else, in the no-super way it will look like this:
class B(A, X, Y):
  def __init__(self):
    A.__init__(self)
    X.__init__(self)
    Y.__init__(self)
    print('This is B')
With super we can minimize it to:
class B(A):
  def __init__(self):
    super(B, self).__init__(self)
    print('This is B')
At first glance this looks like we merely minimize the code to a single line. The real benefit however is that if we did not use super, now our class B would be much more prone to mistakes since either A, X, or Y might change name somewhere (more classes – higher probability of a rename).
I hope all this makes it very apparent that in big OOP projects where you have a lot of interaction between objects, classes, etc. Using super is just a simple trick that adds a huge gain for the programmer. So whenever you need to call an initializer (or any other method) from a parent class, please save yourself some trouble and use super!
Python 2 issues
You might have noticed that I use object in every parent class in the examples above. In Python 3 you don’t have to do this.
class A(object):
  ..
This merely makes a class inherit from object. The problem in Python 2 you see is that not everything is an object. As such we have to explicitly state it. In Python 3 all classes inherit from object be default so the code becomes much cleaner. Notice that even super is much cleaner in Python 3:
class A:
  ..

class B(A):
  def __init__(self):
    super().__init__() # no self pollution
    ..
This is a tutorial on hex which is very useful if you are ever going to read low-level code or program low-level things like network protocols or microcontrollers. I use a real project that I worked on to showcase all this, namely a matrix of 9 LEDs.
You should be able and understand why people put hex in the code instead of raw binary (if it exists for that programming language). There are very specific reasons for doing this and since converting from hex to binary is so damn easy, there is no excuse for you to not be able and do it in your brain.
Binary and LED patterns
I was building a trivial LED matrix the other day for an MBED microcontroller (think Arduino-like). The usual problem is that my brain is faulty so I do all sorts of things in the wrong way. I take this blog as the opportunity to make up for what I learn just to make sure that I won’t forget (and ofcourse to teach others if they are interested).
So my task was to achieve some patterns with 9 LEDs. Notice that it doesn’t matter how the microcontroller was connected etc. since here I am only dealing with how bits and bytes fit into low level programming. My first pattern was a rotating star that you can see below:
This star is made out of two LED patterns: a star and a cross.
The 1s and 0s simply mean if the LED at a position should be turned on or off. Now, when we’re dealing with low level things the minimum unit of information that can be sent is 1 byte (= 8 bits). In our case we have 9 LEDs so we need however a minimum of 2 bytes (= 16 bits). The above examples become the below binaries:
Star:  0000000101010101
Cross: 0000000010111010
Now, the problem is that when we deal with low level programming, most low level languages (C, C++ etc.) don’t let you write numbers as binary in your code. You can’t write printf(0b101) for example. You need separate libraries if you want to do that and that would be fine for our case. But imagine if there was a matrix of 100 LEDs. Someone reading printf(001001010101101010101010101010101110101001011100101) would just get lost in the 0s and 1s. That’s one of the big reasons hex is used – it’s super minimal.
Binaries as integers
At first when I wanted to create a star, I simply converted each binary to an integer and just put it in my code. Below you can see a simplified version of my code.
..
#define STAR  341
#define CROSS 186

int main() {
    while (1) {
        leds.write(CROSS)
        sleep(1)
        leds.write(STAR)
        sleep(1)
    }
}
The way I found those integers was by simply using Python. It is a rather trivial procedure:
>>> 0b101010101
341
>>> 0b10111010
186
Notice that I omit the extra 0s since they don’t add any value just like 000150 is always going to be 150 no matter how many zeros you add at front.
Binaries as hex
The code I used, worked fine. The problem with this solution is that it’s impossible to have a clue what an integer is in binary – and when we deal with low-level programming that matters most of the times. In our case for example each single 1 and 0 controls one LED. Being able to figure out fast the binary of a number in this case is very important.
For example say you find the code snippet below somewhere:
#define STAR1 341
#define STAR2 186
How can you tell if it’s the STAR1 or STAR2 that looks like an ‘X’? It’s just impossible. And what if there were many more stars or if the LED matrix was huge? Then it would be a nightmare to understand the code. That’s where hex comes in handy.
The good thing with hex is that someone can see the hex and decode it to binary in his brain. So say we had the above example but instead of integers had hex values:
#define STAR1 0x155
#define STAR2 0xba
A skilled programmer would directly see 0001 0101 0101 and 0000 1011 1010 with no effort. And he wouldn’t either need to decode the whole number to find out. Watching just the last hex digit of each STAR would give him (or us) a hint about which STAR is which.
It’s time we become that skilled programmer, don’t you think?
Hex to binary in da brain
Fortunately it is very simple to convert hex to binary in the brain. You simply have to understand that each hex number is made out of 4 bits since we need a max of 4 bits to represent the largest number in base 16 (which is the character ‘F’). So 0xF is 0b1111. (Notice that putting 0x in front denotes that the number is in hexadecimal represation and putting 0b denotes the binary representation accordingly.)
The procedure of binarizing a hex is simple:
Find the binary of each hex character
Place 0s in front of each binary (from above) so we always have 4 digits
Squeeze them all together as if they were strings
So for example:
F   is       1111
5   is       0110
FF  is  1111 1111
55  is  0110 0110
5F  is  0110 1111
F5  is  1111 0110
Hopefully you get the hang of it. The question is.. what happens if we have 0x102? This might seem tricky since we get three very simple binaries: 1, 0 and 10. But as I said, if you add the 0s in front before you squeeze them together, you should get the correct value – in this case 1 0000 0010!
Also you need to memorise a few things to be able and do all this. I have written the bare minimum below:
Binary     Decimal
   1    =    1
  10    =    2
 100    =    4
1000    =    8
1010    =    A
1111    =    F
Then it’s quite easy to find in brain all the rest. For example to find the binary of B we can simply think that A is 1010, and that since B is just one step ahead, we add 1 to it and thus get 1011. Or to find 5 we simply have to add 1 to 4 which becomes 100+1=101. And so on.
This should also make it clear what the command chmod 777 in Linux does.
Big fat hex stars
The below is more like an exercise to test what we’ve learned. It should be rather simple to find the hex of the star below.
It might seem overwhelming, but the only thing you need to do is go in groups of 4s and write down each hex value.
Grouping in 4bit groups:
Decoding the above becomes 8388A08388A0 which is WRONG.
This was actually a trap to teach you the hard way that we should always start from the last digit. In this case in the end we are in a situation where we have an orphan digit 1. We can’t work with that since we need 4 digits to make a hex number.
The right way is to always start from the end. This is for all numbers no matter if they are represented in binary, octal, hex, decimal or whatever – as long as they are numbers, always start from the last digit and you’ll do fine. The reason is that when you finally get to the last number you can add as many zeros as you like (or need) without altering the value of the whole thing.
So the correct grouping is this (starting from bottom-right):
And then we just start from the bottom and get 1051141051141! Notice that in the end we again have a single 1 (at the top left this time), but this time we can add as many zeroes as we want since adding zeros in front of a number doesn’t change its vallue.
If you go to any serious company you will find that they have automated tests running for every new update in the codebase of the programs they develop. This assures that every random thing some developer fixes, doesn’t break something else in the program. In most cases you will find Jenkins or some of the commercial solutions like Travis and CircleCI for this.
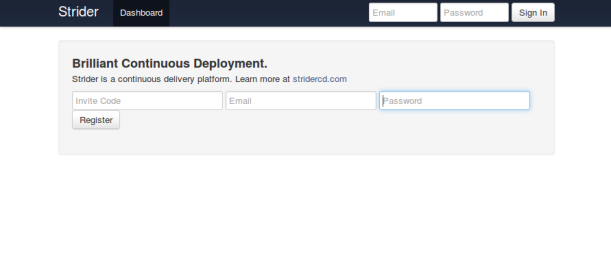
As a metro-sexual hipster developer however you want something that is fast to setup, easy to use and minimal. To be fair there is a huge amount of open-source free continuous integration (CI) programs that do this. On my recent hunt however I found one that shines amongst them: StriderCD.
The big advantages of Strider:
Stable
Beautiful intuitive interface
Integration with Github
Small enough to hack (they even have a guide on how to hack it!)
Plugin API
Helpful active community!
In this tutorial I will setup Strider so that it works even if you sit behind 9.000 firewalls in your company. I will also set it up so that you can move it around and reuse it in the future without the hustle of setting up things from the beginning. For this I will use Docker ofcourse, the hipster’s French wrench. I will also make it so that you can run other containers inside the container where Strider runs. This is helpful if you want to run tests inside their own container for example.
Building Strider
To be sure that you have the latest Strider it is wise that we build everything from scratch. I have created a Dockerfile that will make an image with the latest Strider and setup everything up so that you can use it with Docker.
In case you don’t have Docker:
sudo apt-key adv --keyserver hkp://keyserver.ubuntu.com:80 --recv-keys     36A1D7869245C8950F966E92D8576A8BA88D21E9
sudo sh -c "echo deb https://get.docker.io/ubuntu docker main > /etc/apt/sources.list.d/docker.list"
sudo apt-get update
sudo apt-get install -y lxc-docker
preprocess is a simple shell script I made that will edit the Dockerfile so that in the next step where we build it, it installs the same Docker version as the one outside of the container. This is critical since if the Docker inside the container is different from the one outside of it, we won’t be able to run Docker inside the Strider container.
Running Strider
At this point we have a Docker image named strider:barebones which has a minimal but powerful setup for Strider. It’s time we run it:
ID=$(nohup docker run -d --privileged -v $PWD/data/db:/data/db -p 3000:3000 strider:barebones)
This will run the container with the database stored at $PWD/data/db. That way if for whatever reason the container stops running, we have all the user accounts, projects, etc. intact. Notice also that I use the --privileged flag. This is merely so that we can run containers in containers.
To verify that everything works open your browser at http://localhost:3000 and you should see the login page. Notice that you won’t be able to login to Strider at this point since my Dockerfile recipy keeps things minimal – that means no user accounts by default. Adding accounts is super-easy and you don’t even have to restart anything so that won’t be a problem.
Adding an account
In order to add an administrator account to Strider you just have to access the running container and create a user from within. If you use an older Docker you can use my tool docker-enter. If you run Docker 1.3+ then you can use docker exec.
docker-enter way:
sudo docker-enter $ID
strider addUser
..
exit
docker exec way:
docker exec -it $ID strider addUser
Follow the instructions to make a new account. Then just exit the running image and just refresh the webpage http://localhost:3000 (no need to restart the running image). You should be able and login in to Strider with the credentials you just gave!
Saving for the future!
Now, notice that all configurations, projects, user accounts, etc. are all stored in the folder db/data. In order to move the whole thing somewhere you simply move the folder to the computer you want and run strider:barebones as we did before. Ofcourse you will need to rebuild the whole thing as before as well or you can either save it to the cloud:
Remember to replace username with your own username at the Docker registry. Once all this is done, you can run directly strider from any computer. The image will be downloaded automatically.
docker run -d --privileged -v $PWD/data/db:/data/db -p 3000:3000 username/strider:barebones
If data/db is not at the directory where you try to run Strider then a fresh database instance will be used.
I spent quite some time lately trying to do all of sort of things with USB and Python. I will put out what I’ve learned through this course. Ofcourse I could use Pyusb or some other library but where’s the learning in that? As the Brits say: give a man a fish and you feed him for a day; teach a man to fish and you feed him for a lifetime.
This tutorial starts with a brief overview and then goes into general usage of Dbus and lastly using Dbus with UDisks2 to get notified if a USB storage device has been inserted.
Update:
I initially wrote this article with the title “Python detection of USB storage device”. After some time of working with UDisks2 and Dbus however I found out that the code tends to be very ugly and unexpected behaviours occur (not sure if it’s because of Dbus or UDisks2). So if you want to control an input/output device like a USB device or get events, I recommmend you use pyudev straight away! I will probably write an article on how to use that too. If you want to use DBus for educational purposes or want to use it maybe with some other software, please continue reading.
The daemons checkin’ out your USB
There are two main daemons running on Ubuntu (and probably all major distros) that deal with connecting/disconnecting devices.
The one is udisks which deals with storage devices like USB sticks and the like. The second is udev, a daemon that deals with all kind of devices from PCI boards to the keyboard and mouse (including everything that udisks deals with).
Let’s prove that they exist and that they are running on our system:
Now, depending on how old your Linux distribution is you might have udisks or udisks2 (fourth process) and then you have the udev daemon (second process). But what do these daemons do? Well let’s check for ourselves, shall we?
Let’s monitor our USB
Open two terminals. In the first type:
udisksctl monitor
And on the second one type:
udevadm monitor
These are front-ends for the daemons udisks and udev respectively.
Now, while looking at the two terminals we do the below:
First remove or put in a non-storage device like a mouse or a keyboard (USB mouse/keyboard works fine).
Now put in or remove a storage device (USB stick, external hard disk, etc).
You will notice that for the first action, udev prints a bunch of stuff while udisks does nothing. For the second case where we mingle with a storage device, both services print out stuff.
For example when I insert a USB stick I get this on the udisk terminal:
manos@box:~$ udisksctl monitor
Monitoring the udisks daemon. Press Ctrl+C to exit.
11:31:00.793: The udisks-daemon is running (name-owner :1.76).
11:31:05.850: Added /org/freedesktop/UDisks2/drives/Samsung_1040d8f1f9b92b56e6d1af1d7a0dd4c82781
  org.freedesktop.UDisks2.Drive:
    CanPowerOff:                true
    Configuration:              {}
    ConnectionBus:              usb
    Ejectable:                  true
..
and this on the udev terminal:
manos@box:~$ udevadm monitor
monitor will print the received events for:
UDEV - the event which udev sends out after rule processing
KERNEL - the kernel uevent

KERNEL[2569.327243] add      /devices/pci0000:00/0000:00:14.0/usb2/2-3/2-3.4/2-3.4.2 (usb)
KERNEL[2569.328960] add      /devices/pci0000:00/0000:00:14.0/usb2/2-3/2-3.4/2-3.4.2/2-3.4.2:1.0 (usb)
KERNEL[2569.329026] add      /devices/pci0000:00/0000:00:14.0/usb2/2-3/2-3.4/2-3.4.2/2-3.4.2:1.0/host7 (scsi)
..
This makes it clear that udisks records only changes to storage devices like USB sticks and hard disks. udev on the other hand monitors any device that can connect/disconnect to your PC.
On a sidenote (in case you’re wondering) the KERNEL[blah blah] messages that appeared on the udev terminal, are Netlink messages sent from the kernel to udev.
The bigger picture
Now, we know that udisks is just like udev but with the difference that udisks plays with storage devices.
It turns out that udisks actually uses udev itself:
DEVICE INFORMATION

       udisks relies on recent versions of udev(7) and the Linux kernel.
So what does udev do then? Well udev’s main work is to populate the /dev folder on your root directory. So it’s kind of a discovering daemon that tells the kernel what devices are connected and where. That’s all!
Below you can see the bigger picture of how everything works together.
udev, udisks and dbus, they are all daemons running in the background from the time you start your computer.
Netlink and Dbus Netlink and Dbus are two different protocols used for processes to talk with each other. In the first case the kernel communicates with udev and in the second case udisks with the dbus daemon. Many applications use the dbus protocol like Unity, NetworkManager, Skype, and pretty much all Gnome apps.
Notice that the dbus-daemon that is running all the time is part of the dbus protocol. I talk more about how dbus works, later so you get an understanding as to why a daemon is needed.
What’s udev?
The kernel uses the Netlink protocol (essentially UNIX sockets) to send messages to udev daemon. These messages are the ones we saw earlier when we typed udevadm monitor in the terminal. The way this works is by udev setting up some specified rules that the kernel reads at bootup. Then whenener a device is connected to your computer, a message to udev is sent from the kernel.
udisks uses the udev library and thus has access to all this. If you can use udev then you can pretty much access the kernel messages sent to udev.
And what about that dbus thingy?
The dbus daemon is not specific to udisks only. dbus daemon runs always and is a generic solution for processes to exchange information. NetworkManager for example uses this, so someone could create a program that automatically gets notified if an ethernet card is inserted by simply using dbus. All programs that use dbus, have access to each other. Luckily for us, udisks uses dbus 🙂
Choosing between udev, dbus and direct kernel messaging
From all the above it should become apparent that there are three main ways we can get notified about a USB insertion:
Talk directly with the kernel with Netlink messages. In this case we essentially place ourselves in udev’s position.
Use the udev library like udisks does. In python this is done with using pyudev.
Use the Dbus protocol to talk with udisks directly.
There are pros and cons with all these three approaches. I will explain a bit on all three starting from the lowest level to the highest level.
Kernel
The kernel way is probably the best but is probably a hell to get working since it’s so low-level. You need to deal with raw sockets since that’s how Netlink communication is done. The good thing with this approach is that you are not dependent on anything more than the kernel itself. So it’s pretty hard that something will break and you can always be sure that your solution will work for any distribution.
udev
udev is probably the best practical solution. It handles the messages sent from the kernel so we don’t need to handle them. We only use a udev library and that’s all. From what I am aware all major Linux distributions use udev so you’re not going wrong with this solution. The only bad thing (and this is my own opinion) is that the udev library bindings for Python don’t come with Python so you need to install them on your system on your own.
Dbus
Dbus uses itself udev as we mentioned earlier so it has already a dependency. However as we sayied, pretty much all distros use udev so that shouldn’t be a problem. The main good things with Dbus is that the dbus library comes with Python (both 2 and 3) so you can start coding directly without having to install a bunch of stuff. An extra good thing is that maaaaaaany programs use the Dbus protocol so once you learn it, you can potentially access a lot of things. The bad thing with dbus is its ugly design (my opinion again).
In this tutorial I will talk about dbus since it’s one of the things that you learn once and can use in many different situations in the future.
How dbus works
Choosing Dbus means we will have to learn a bit on how Dbus protocol works and then try and find out how udisks uses dbus. I will try to make this as easy as possible even if it’s a quite hard task considering how sparse information is and how ugly some things in dbus are.
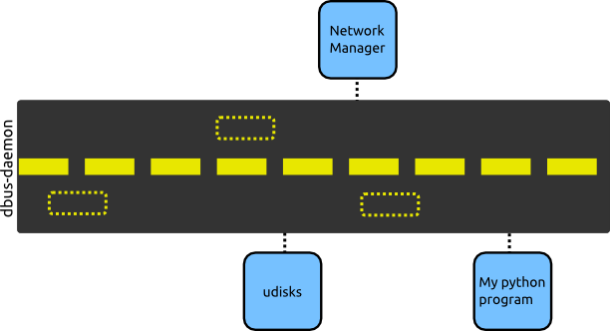
So what exactly is dbus? How does it connect things together? I think the easiest way to explain, is by showing you a diagram.
The dbus-daemon keeps a sort of a freeway which all programs can access. In our diagram, udisks, NetworkManager and our python program can share information between them. The dotted yellow rectangles in the diagram are representing the messages exchanged between the programs.
There are actually two freeways (buses)
Dbus uses two different freeways like the one I mentioned above. That also means there are two dbus-daemon running. One is a system-wide freeway and the other is a session-wide freeway. In this context, session is the duration of time that a user is logged in.
These dbus daemons are running:
ps ax | grep dbus-daemon
  844 ?        Ss     0:00 dbus-daemon --system --fork
 2451 ?        Ss     0:00 dbus-daemon --fork --session --address=unix:abstract=/tmp/dbus-IP8uQnHdYR
 2545 ?        S      0:00 /bin/dbus-daemon --config-file=/etc/at-spi2/accessibility.conf --nofork --print-address 3
As you see there are two dbus-daemon running, or three in this case. Omit the third one (no idea what that is). The two main daemons are the first two. Notice the --system in the first one and the --session in the second. These are exactly what you might guess they are.. The first one keeps the system-wide freeway and the second keeps the session-wide freeway. I think it’s time we drop the ‘freeway’ word and use bus instead.
Now each freeway has its own rules. Furthermore, each program using dbus, can setup its own rules. All these rules are of the type “root can send this type of message” and “any user can access this type of message but not send this type”, etc.
An important thing to notice is that surprisingly there is a dbus-daemon running on your system. This daemon is used to put all programs using dbus communication together. So when we will try to connect to program A via dbus, we will actually connect to dbus-daemon which acts as a mediator.
So how do we use this module? I give below two examples. First I try to access NetworkManager and then udisks. I do this to show you how the workflow is and as a proof that you can use dbus for more than merely USB insertion scenarios.
Listing programs connected to dbus
The simplest way to find which programs are connected to dbus is from Python.::
That will list all programs connected to the system bus. In practice, this means that we can connect to any of these programs (as long as we connect to the right bus ofcourse)!
In the same fashion we can list programs connected to the session bus (these are probably much more):
Notice that in some cases we get domain looking strings and in some cases we get weird numbers like ‘:1.83’ and ‘:1.128’. These are pretty much the same thing as domains and IP on the internet. In this case however instead of the domain/IP pointing to a host, they point to a program on our computer. Ofcourse the number “:1.128” is quite cryptic and there’s actually no way to know which program it resolves to. But that is fine since the programs that are meant to be accessed, are given domain-like names just so that we can find them easily.
The right tools
Now that we know which program we want to connect to, we have to somehow find out how and what we can access from it. For this I will use a tool called d-tree. This tool gives you an overview of all programs connected to dbus and also give you a list of things that you can access.
On Ubuntu you can install this program directly with:
sudo apt-get install d-feet
On a side-note, you might feel tempted to access all this via Python or by using the terminal. Do your self a favour and don’t. I already took that path and there are just too many issues you might run into that you’ll never be able and truly understand how things run without getting in the low-level source code.
Running a program’s method
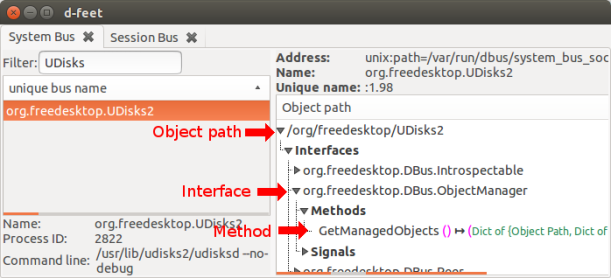
Whenever you want to access a program’s method or property, you need exactly four things:
The program’s domain name
Object path
Interface
The method or property (signals are a special case so will talk about them separately)
All these things are pretty random and make little sense. However that’s the API that we have for DBus so if you want it you have to bare with me. You just have to learn how to find each one of them and then how to use them in your Python program to access the property or method you want. You will be using d-feet to locate all these four things!
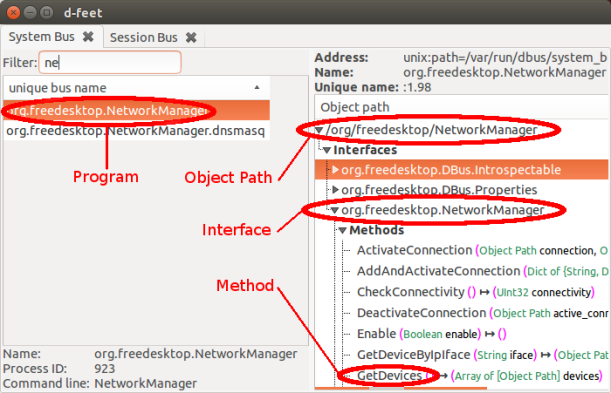
As an example I will take NetworkManager. Just look below..
The method I want to run in this case is GetDevices(). However in order to run it I have to locate all the other things: the program, the interface and the object path. Just looking at the snapshot it’s easy to see where all these are located. As said, you just have to get used to finding them for any program.
Translating all this to code looks like this:
import dbus
bus = dbus.SystemBus()
obj = bus.get_object('org.freedesktop.NetworkManager', '/org/freedesktop/NetworkManager')
obj.GetDevices()
Where ‘org.freedesktop.NetworkManager’ is the program’s domain and ‘/org/freedesktop/NetworkManager’ is the so called object path. There is no real logic as to what an object path is. It’s just some bad implementation in the core, where someone tried to bring object oriented coding into Dbus which is written in C. What came out of this effort is this monster of illogical terms that just don’t fit together and just complicate things. However we have to learn all this if we are to use Dbus.
Now if you are a person that spots things, you probably noticed that we didn’t enter the Interface (which happens to look exactly like the program name) anywhere in our code. So how come the code works when I just stated that we always need 4 things? Well.. it’s one of those bad designs. The reason it works is because the dbus library tries to “guess” which interface you want to use. In this case it was right. However many times it doesn’t work and you will run into problems that are really hard to debug. So a friendly advice is to ALWAYS give the 4 things mentioned. FOUR IS THE NEW FIVE.
Same output as before. But use this convention and you will never run into debugging nightmares. After all, explicit is better than implicit and that is especially true in this case.
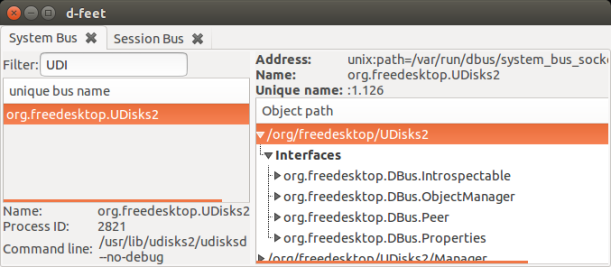
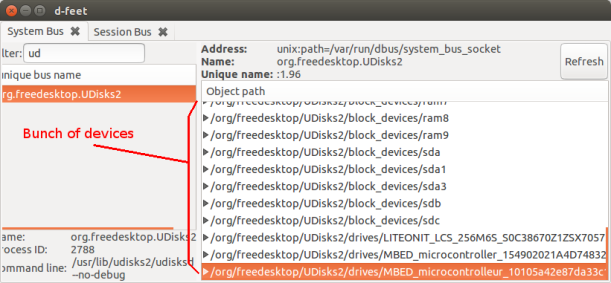
Listing devices with udisks
Building on top of what we did with NetworkManager we continue but this time with UDisks2.
As you might notice, udisks doesn’t have a straighforward method that we can call to list all devices. So someone has to dig through the things, read UDisks2 dbus API or simply google. Luckily for you, I did the digging.
From the d-feet snapshot we can see directly the four things we need: the program domain (org.freedesktop.UDisks2), the interface (org.freedesktop.DBus.ObjectManager), the object path (/org/freedesktop/UDisks2) and lastly the method (GetManagedObjects()).
You should get a blob of stuff including any mounted drives. Indeed you still have to dig through things but at least you shouldn’t be totally lost by now.
Getting properties/attributes
Building on the above, we will try to access some properties of a device. But first have a look at d-feet and pay attention to the fact that if you scroll down you will see the storage devices connected to your computer.
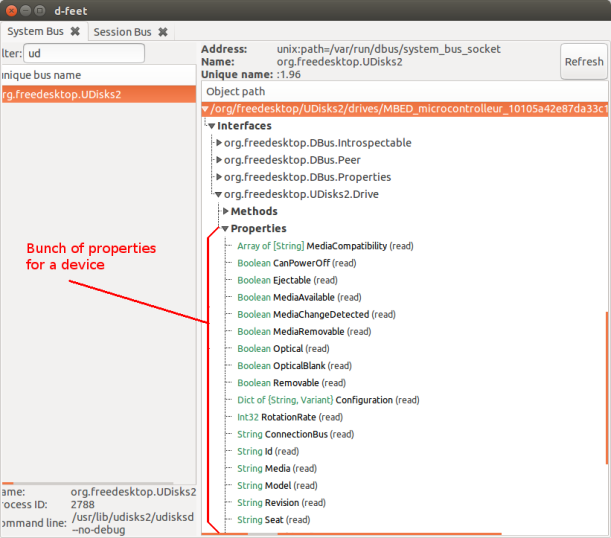
Then we can also see that the device I choose has a bunch of properties.
Now the logical thing to access these properties would be to do as we did earlier with the methods. Instead of methods we would just call the properties. And that my friend.. just won’t work! (Ugly Dbus, I hate you.)
So in order to access any property of any object we need to use a very specific interface: ‘org.freedesktp.DBus.Properties’.
So to not make this too tedious I will give the whole code again:
import dbus
bus = dbus.SystemBus()
obj = bus.get_object('org.freedesktop.UDisks2', '/org/freedesktop/UDisks2/drives/MBED_microcontrolleur_10105a42e87da33c103dccfb6bc235360a97')
iface = dbus.Interface(obj, 'org.freedesktop.DBus.Properties') # Here we use this 'magic' interface
iface.GetAll('org.freedesktop.UDisks2.Drive')
Notice that the object path ‘/org/freedesktop/UDisks2/drives/MBED_microcontrolleur_10105a42e87da33c103dccfb6bc235360a97’ has to be replaced with one that actually exists on your computer.
Then we open the correct interface and call GetAll(). The argument to GetAll() is the interface name that you want to get the properties of. As I told many times.. Dbus is so damn confusing! Anyway, the good thing is that the ‘org.freedesktp.DBus.Properties’ interface has only three methods we need to learn: Get(), Set(), GetAll(). So things can’t get more complicated than this.
If we want to access a very specific property we just use Get() instead of GetAll() and pass the interface name followed by the name of the property we want:
import dbus
bus = dbus.SystemBus()
obj = bus.get_object('org.freedesktop.UDisks2', '/org/freedesktop/UDisks2/drives/MBED_microcontrolleur_10105a42e87da33c103dccfb6bc235360a97')
iface = dbus.Interface(obj, 'org.freedesktp.DBus.Properties')
iface.Get('org.freedesktop.UDisks2.Drive', 'Id')     # Only difference
How about that USB insertion notification? (signals)
We saw how we can call methods but what about the interesting things like getting notified about an event like USB insertion? For this we can use signals.
All a signal is, is an incoming message from UDisks2 telling us that a mountable device has been inserted. From our part this signal will run a function in our code, a so called callback function. If you check in d-feet you will see many types of signals. The one that interests us is InterfacesAdded() from org.freedesktop.DBus.ObjectManager.
So how do we do this? I will get you straight the code for this one and do the explaining afterwards.
import dbus
from dbus.mainloop.glib import DBusGMainLoop
DBusGMainLoop(set_as_default=True)

bus = dbus.SystemBus()

# Function which will run when signal is received
def callback_function(*args):
    print('Received something .. ', args)

# Which signal to have an eye for
iface  = 'org.freedesktop.DBus.ObjectManager'
signal = 'InterfacesAdded'
bus.add_signal_receiver(callback_function, signal, iface)

# Let's start the loop
import gobject
loop = gobject.MainLoop()
loop.run()
If you run the above code, you will get printed things for every disconnection or connection of a storage device. Try plugging in your USB stick and see for yourself.
There are two things worth noticing in the code with signals:
We import and use a bunch of weird things like gobject and DBusGMainLoop
We don’t need the four things like earlier. We only need to know the interface and the signal (oh and both are just strings)
For our use the only thing we need from these libraries are the so called loops. The loops are needed since someone has to be looping somewhere waiting for the signal to arrive. We could probably create our own loop but I am not so sure how easy it would be. You could take that route if you want, may Zoidberg Jesus guide you the way. Below I mention a bit on what excactly Glib and Gobject is, just in case you’re curious and bored to google.
Glib
Glib is a library that originally was developed to be used with Gnome’s GTK. However later it split from it so that it could be used on any Linux machine. Many programs use the Glib library since it’s it provides so many things that is hard to find (in C) in a general-purpose library. Some things offered are data-structures like hash tables and linked lists (just keep in mind next time you will need any of this).
Gobject
Gobject is built on top of Glib. What it does is merely allow object oriented programming with the Glib. Since Glib is a C library, it doesn’t have object-oriented things lik objects, inheritance, classes etc. For that reason Gobject was developed. In our case, the reason we use it is to easily be able and change things on the loop without having to dig inside the C code.
Unblocking the loop
Now the loop above seems to work fine. There is a problem though. Your whole program blocks in this loop. Even if you add 1000 threads, they will all block for some weird reason and only the loop will run.
In order to stop the loop you have to:
Add the code with the signal on a Python thread
Initialize internally a thread for gobject (no clue what that does but won’t work if you don’t do it)
So in practice we just put the whole code above in a separate thread and then we make sure that gobject is calling threads.init() before we run() the loop.
And here is the code with the loop running on its own thread:
import threading, time

def start_listening():
    import dbus
    from dbus.mainloop.glib import DBusGMainLoop
    DBusGMainLoop(set_as_default=True)

    bus = dbus.SystemBus()

    # Function which will run when signal is received
    def callback_function(*args):
        print('Received something .. ', args)

    # Which signal to have an eye for
    iface  = 'org.freedesktop.DBus.ObjectManager'
    signal = 'InterfacesAdded'
    bus.add_signal_receiver(callback_function, signal, iface)

    # Let's start the loop
    import gobject
    gobject.threads_init()      # Without this, we will be stuck in the glib loop
    loop = gobject.MainLoop()
    loop.run()

# Our thread will run start_listening
thread=threading.Thread(target=start_listening)
thread.daemon=True              # This makes sure that CTRL+C works
thread.start()

# And our program will continue in this pointless loop
while True:
    time.sleep(1)
    print("tralala")
This is a good starting point for your program. Feel free to copy/paste it 🙂
Digging further
All this should give you an idea on how to get started. Now the main thing is probably that you have to filter out some signal events since InterfacesAdded() might run several times for a single unplug or plug-in of a device. Or depending on your case maybe you want to wait for a different signal. Using d-feet this should be rather easy to figure out.
The easiest way to do things from my experience is to use d-free and the Python interpreter directly to test things. However if you feel comfortable with ugly complicated interfaces then the UDisks2 dbus API might be of benefit for you.
This guide will show you how to run a GUI application headless in a Docker container and even more specific scenarios involving running Firefox and Chrome. If you are not interested about those then you can just stop in the middle of this tutorial.
What the hell is X?
X is a program that sits on a Linux machine with a monitor (so servers usually don’t use X). X’s job is to talk to the Linux kernel in behalf of GUI programs. So if you are playing a game for example, the game (that is, the application) is constantly sending drawing commands to the X server like “draw me a rectangle here”. X forwards all this to the Kernel which will further forward the information to the GPU to render it on the monitor.
X can even receive commands from the keyboard or mouse. When you click to shoot on your game for example, the command “click at 466,333” is sent from your mouse to the kernel, from the kernel to the X and from X to the game. That way the game can have a clue on what is happening!
You will often hear X being called a server and the reason for that is simply because the way the applications send commands to it is through sockets. For that reason the applications are also referred to as clients many times.
If you are reading this then the X is running on your PC. Let’s prove it:
We can see that X is running as root and has PID 1436. An other important thing is to notice the :0 which is called display in X jargon. A display is essentially:
A monitor
A mouse
A keyboard
And this is the bigger picture of how it all looks together:
Now there is a variable in Linux that is used whenever we run a GUI program. That variable is surprisingly called DISPLAY. The syntax of the DISPLAY variable is
<hostname>:<display>.<monitor>
. Let’s check the DISPLAY on our computer:
> echo $DISPLAY
:0
I get :0, which means we use display 0. Notice however that this says nothing about which monitor we use. This makes sense since if you are running 2 or more monitors on your Linux you still have the same environment variables in both of them. It wouldn’t make sense that an environment variable changes just because you echo it from a different screen, would it? For that reason we get the display and not the monitor so that we get the same output on both. As about the hostname, since there is no info about it, the local host is assumed.
On a notice, if you have multiple monitors you can still specify which monitor to run an application by simply typing the full display variable you want. So if you have a monitor 0 and a monitor 1 on the current display, I can run firefox on monitor 1 with:
DISPLAY=:0.1 firefox
Creating a virtual monitor
Instead of running X, we can run a different version of it that can create virtual displays. Xvfb (virtual framebuffer – whatever the hell that means) will create a virtual monitor for us.
So let’s make a new monitor (I assume you have installed xvfb):
Xvfb :1 -screen 0 1024x768x16
This will start the Xvfb server with a display 1 and a virtual screen(monitor) 0. We can access this by simply typing DISPLAY=:1.0 before running our graphical program. In this case the program will start in the virtual screen instead of our monitor.
We see we have the normal display 0. (A way to tell it is the default screen is to see that it runs as root.) We can also see the second display :1 and screen 0 with resolution 1024×768. So what if we want to use it?
Open a new terminal and type:
> DISPLAY=:1.0 firefox
..
This will start firefox at the given display. The reason I use the DISPLAY at the same line is to make sure that the subprocess inherits the variable DISPLAY. An other way to do this is to type:
> DISPLAY=:1.0
> export DISPLAY
> firefox
..
Run a GUI program in a Docker container
We will now create a virtual screen inside a docker container.
So now we are sure that we are running the virtual screen. Let’s access it and run something graphical on it. In this case I will run Firefox and Python+Selenium just as a proof of concept of what is happening.
First I put my display variable and use export to assure that any sub-shells or sub-processes use the same display (with export, they inherit the variable DISPLAY!):
root@660ddd5cc806:/# firefox
(process:14967): GLib-CRITICAL **: g_slice_set_config: assertion 'sys_page_size == 0' failed
Xlib:  extension "RANDR" missing on display ":99.0".
(firefox:14967): GConf-WARNING **: Client failed to connect to the D-BUS daemon:
//bin/dbus-launch terminated abnormally without any error message
..
The errors don’t mean anything. But we can’t be sure, can we? I mean, since we can’t see what’s happening it’s really hard to tell. There are two things we can do, either use ImageMagick to take a snapshot and send it to our host via a socket or we can simply use Selenium. I will do that since most people probably want to achieve all this for testing purposes anyway.
If you get a bunch of HTML, then we have succeeded!
The Chrome issue
If you try and run Chrome in a Docker container, it won’t work even if you have setup everything correctly. The reason is that Chrome uses something called sandboxing. Reading this I could not let but notice the word jail. Apparently it seems that Chrome uses Linux containers (the same that Docker uses). For this reason you have to put a bit of extra effort to solve this issue since because of technical difficulties it’s not possible to run containers in containers.
I have now installed Selenium, Chrome and Xvfb. Now I am going to make make a virtual monitor and run Chrome:
root@7dd2c07cb8cb:/# Xvfb :99 -screen 0 1024x768x16 &> xvfb.log &
[1] 6729
root@7dd2c07cb8cb:/# DISPLAY=:99.0
root@7dd2c07cb8cb:/# export DISPLAY
root@7dd2c07cb8cb:/# google-chrome
Xlib:  extension "RANDR" missing on display ":99.0".
Xlib:  extension "RANDR" missing on display ":99.0".
[6736:6736:1017/143449:ERROR:desktop_window_tree_host_x11.cc(802)] Not implemented reached in virtual void views::DesktopWindowTreeHostX11::InitModalType(ui::ModalType)
ATTENTION: default value of option force_s3tc_enable overridden by environment.
failed to create drawable
[6775:6775:1017/143449:ERROR:gl_surface_glx.cc(633)] glXCreatePbuffer failed.
[6775:6775:1017/143449:ERROR:gpu_info_collector.cc(27)] gfx::GLContext::CreateOffscreenGLSurface failed
[6775:6775:1017/143449:ERROR:gpu_info_collector.cc(89)] Could not create surface for info collection.
[6775:6775:1017/143449:ERROR:gpu_main.cc(402)] gpu::CollectGraphicsInfo failed (fatal).
[6775:6775:1017/143449:ERROR:sandbox_linux.cc(305)] InitializeSandbox() called with multiple threads in process gpu-process
[6775:6775:1017/143449:ERROR:gpu_child_thread.cc(143)] Exiting GPU process due to errors during initialization
[6736:6736:1017/143449:ERROR:gpu_process_transport_factory.cc(418)] Failed to establish GPU channel.
It seems that it works. It’s normal that we get the gpu errors since we don’t have a gpu! However I don’t like gambling so we will take it a step further to check that the browser actually works. However for this I will need to download the webdriver for Google Chrome..
When you login to a remote computer it will each time ask for a password, something that can become tedious. For that reason we can use keys, small pieces of information (essentially strings) on each computer that are used for each computer to identify the other and acknowledge that they are who they say they are.
You need to create two keys for this. One key will be stored on the server – the computer you try to connect to. The other key will be stored on your computer.
The first key, the one that the server holds, is called the private key and there is only one. The other key that we hold is called public since there can be many copies of this key to many other computers. The two keys are heavily dependent on each other. If one changes, then the other won’t work.
But let’s how all this looks in practice..
From the machine you are trying to connect from
ssh-keygen -t rsa -b 4096
This creates a key based on algorithm RSA with length 4096 (default is 2048). The longer the key, the harder to break but on the downside it takes a bit more time to authenticate (more CPU usage).
Generating public/private rsa key pair.
Enter file in which to save the key (/home/a/.ssh/id_rsa):
Enter passphrase (empty for no passphrase):
Enter same passphrase again:
Your identification has been saved in /home/a/.ssh/id_rsa.
Your public key has been saved in /home/a/.ssh/id_rsa.pub.
That should generate two keys:
~/.ssh/id_rsa – a private key that is unique to the machine and if lost, security is breached
~/.ssh/id_rsa.pub – a public key, that can be visible to anyone, without any security impact
The passphrase is similar to a password and is added to the key for extra security. In case your private key gets stolen, you should have a little time to change all keys on the systems.
At the server you are trying to connect to
In order to connect from the machine where we created the keys, to a remote server we need to configure the server and let it know that he can trust the x machine with public key y. From the previous example that key is the id_rsa.pub
On the server machine we need to append that id_rsa.pub, since it’s public, there is no problem if we send it with an email or even the insecure telnet. Once we have the id_rsa.pub string on the server, we append it to ~/.ssh/authorized_keys
You can even add it manually with a text editor if you happen to have the public key as a string (from an email for example).
Now you can add that to more than one servers since it’s a public key. The id_rsa should stay secure on your machine while the id_rsa.pub can be stributed to the machines you are trying to connect to.
The droplet way (digitalocean)
Now there are some graphical ways to do so without dwelling inside your machine but I think it’s easier to do it manually now that we got an idea of how it works with ssh keys. The easiest way to add a key is with this command
where xxx.xxx.xxx.xxx is the IP of your droplet. Once that is succesfull, you would be able and ssh to your droplet without any password asked.
Troubleshooting
Known_hosts error
Trying to ssh to your droplet gives:
@@@@@@@@@@@@@@@@@@@@@@@@@@@@@@@@@@@@@@@@@@@@@@@@@@@@@@@@@@@
@ WARNING: REMOTE HOST IDENTIFICATION HAS CHANGED! @
@@@@@@@@@@@@@@@@@@@@@@@@@@@@@@@@@@@@@@@@@@@@@@@@@@@@@@@@@@@
IT IS POSSIBLE THAT SOMEONE IS DOING SOMETHING NASTY!
Someone could be eavesdropping on you right now (man-in-the-middle attack)!
It is also possible that a host key has just been changed.
The fingerprint for the ECDSA key sent by the remote host is
b9:75:ff:10:fa:42:f1:b7:6f:d2:1f:8e:f4:f7:1a:cd.
Please contact your system administrator.
Add correct host key in /home/a/.ssh/known_hosts to get rid of this message.
Offending ECDSA key in /home/a/.ssh/known_hosts:6
remove with: ssh-keygen -f “/home/a/.ssh/known_hosts” -R 178.62.200.200
ECDSA host key for 178.62.200.200 has changed and you have requested strict checking.
Host key verification failed.
The reason we get this message is that we erased the droplet and created a total new. However our computer has stored the key of the older droplet. A fast fix is to simply erase all known_hosts:
rm ~/.ssh/known_hosts
Droplet password doesn’t work
Check first if you got an email with a new password. If not, reset your password for the specific droplet following digitalocean’s guidelines.
If you are mingling with docker and containers on servers, you’ll at some point want to have two containers communicate with each other.
For example if you have an Apache server, Django+Python and a MySQL server and you want to do tests on different configurations/versions of these, you should probably go the container-way: putting each of them on their own container. However since all these services are interchanged in some way (database has to communicate with web server, apache server has to communicate with django), the containers have to talk with each other somehow.
Possible solutions
There are essentially four ways to accomplish container-to-container communication:
Having containers inside containers
Using volumes (shared folders)
Mapping ports (communication over TCP/IP)
Linking containers (communication over.. TCP/IP?)
I will completely omit the first way since it’s a brainfuck both conceptually and technically (yes, I am aware of Dind). Been there, done that, and it wasn’t pretty.
The second solution is about sharing folders between host and container or between containers by using docker’s --volume flag. This is practical when you want to share files (source code, configuration files etc.) on a local machine. If you want containers on different hosts to communicate however this won’t suffice.
The two remaining solutions is the meat I will try to break down for you (and minimize your flatulence from the learning curve). I did my research and I will do my best to convey what I came down to. But enough talk, let’s start!
Terminal to terminal speaking
I will use netcat to show how all these things work. To remind you, netcat is a Unix tool similar to cat but supposed to work on the network (thus the name net-cat). Practically it’s used when you have to copy/paste from host to an other host, chat with someone fast, or just test communication between two hosts like we do here.
You can test it on your home computer. Open two terminals and type in one of them
netcat -l 8000
and on the other
netcat 127.0.0.1 8000
Whatever you type on one terminal now, will appear on the other one.
Terminal to container speaking
Let’s take this a step further, by containerizing the listening netcat. In a new terminal type:
docker run -i -n -p 9000:2000 ubuntu netcat -l 2000
that creates a new container with an internal port 2000. The port 9000 is the port on our system. Whatever arrives to that will automatically be forwarded to our container’s port 2000. This is somehow similar to port forwarding on home routers. (I explain more on how this actually works later.)
The flag -n is a deprecated flag for networking. In practice without the -n flag, everything will work as before but for some weird reason there will be an initial lag for the first netcat message. So if you don’t use it, just wait a bit longer.
We should now have a container running a “listening” netcat. Let’s open a terminal (on the same host) to try and talk with it:
netcat 127.0.0.1 9000
Or from a different host:
netcat <computer IP> 9000
Keep in mind that different containers on the same machine can have the exact same internal IP but not the same system one. So you can create a bunch of containers as long as you change the system’s IP:
docker run -d -p 9000:2000 ubuntu netcat -l 2000
docker run -d -p 9001:2000 ubuntu netcat -l 2000
docker run -d -p 9002:2000 ubuntu netcat -l 2000
It’s all legit baby!
Container to container speaking
We take this a step further by having the listening container as before but instead of opening a terminal to connect to it, we will create a new container on a different host.
So create a new container on the first host (same command as before)
docker run -i -p 9000:2000 ubuntu netcat -l 2000
Then we create a new container on the second machine (or same):
docker run -i -t ubuntu bash
root@879ad5d4251a:/#
On the new prompt that we get we can netcat directly to the first host:
root@879ad5d4251a:/# netcat 10.2.202.156 9000
This should work as a charm as long as you use your LAN IP.
There are some weird networking behaviours. For example if you netcat by using the IP of the container (eth0 inside container) there is an initial lag but after some seconds the message arrives. The same behaviour occurs if you omit the -n flag but use the LAN IP (which otherwise works). If I start a bash session in the container and listen to 9000 with netcat there, then it works flawlessly. Weird stuff indeed.
A whole network under the city
I omitted quite some information in an effort to jumpstart you. This information is however crucial if you want to use port forwarding and container communication on different hosts. There’s a concept that will save yourself some headaches:
There is a whole virtualized network when we use Docker.
Let me prove that to you. I create two containers and then I check the IPs of them and the IPs of the host. I do that by running ifconfig on each terminal.
Putting it all down sums up to the below picture.
You see, Docker creates a virtual IP for each container we create. Furthermore on our host we have a virtual interface called docker0. That can be considered the router. Now on the same host we are able to communicate with any container if we know their IP.
Now, if a container is listening on a specific port we are able to communicate with it by knocking on its door with a pair of IP address and port number.
Let’s use this new knowledge on the previous example with netcat. Let’s assume that container 1 is listening on internal port 2000 and system port 9000 (like before):
The significant information here is that we can directly speak to the container if we know its IP. Pay attention also to that we need to use the correct port in that case.
Container to container speaking via links
So what are those so called links? Nothing special actually. It’s just some variables passed from one container to an other. In most cases these variables will hold things like IPs, ports, etc. Thus it’s just a step of simplifying things for us – in the end we will probably just use these variables to connect as before.
Let’s see how it works. Start by creating a first container that will act as a server:
docker run -i -t -p 8000:8000 --name myserver ubuntu bash
and then a second container that will act as a client:
docker run -i -t --name myclient --link myserver:myserver ubuntu bash
Nothing special huh? Well the magic happens if you inside the client (second container) run:
You will successfully ping the other container. $MYSERVER_PORT_8000_TCP_ADDR is simply a variable set by docker on the newly created container, the one with the --link flag. You can see all variables with the command env. Depending on what flags you passed to the container, you will see appropriate things. In practice, if you don’t use the -p flag, you won’t see anything interesting (useful).
The --name flag is needed when we use linking as we need an identifier for the container. When we do the linking we need pass the name of the other container, the one that we want to link to and an alias for it. The alias is used merely as a prefix for the variable names. For example if we used --link myserver:dingdong instead of --link myserver:myserver then the variable above would be $DINGDONG_PORT_8000_TCP_ADDR.
That’s pretty much all to linking! By using these variables you can get the IPs and ports of other containers on the same host. That’s an important annotation. You can only link to a container running on the same hosts. For communicating to containers on distant hosts you’ll need to use port mapping as explained earlier.
A few days ago I wrote a tutorial on how to setup docker and use it between different machines. Now that was a nice first insight on how to jump-start using docker. It was also a nice way to showcase the possibilities and limitations of Docker.
In this post I will give some practical information on how to use docker as a developer.
Setup
To use Docker for development of software we want mainly three things:
Have our source code on the host machine. That way we can use GUI editors and whatever tools we want from outside the container.
Be able to have multiple terminals to the same container. This is good for debugging
Setup a docker image which we will use for running our program. I will use Django and Python for that.
And for the visual brains out there:
As you see in the pic, I am using Ubuntu as my host machine. At the same machine I have a folder with the source code and two terminals. Then I run a container with OpenSUSE. The folder and terminals reside ont he host machine but they communicate directly with the container. I will describe below how to achieve all this.
Multiple terminals
The easiest way to have multiple terminas is to use a small tool called nsenter. The guide can be found at https://github.com/jpetazzo/nsenter but it sums up to running this one-liner from any folder:
> docker run --rm -v /usr/local/bin:/target jpetazzo/nsenter
That installs nsenter on the host machine. After that, we can use it directly. So let’s try it. Open bash in a container with ubuntu as our basic image:
> docker run -t -i ubuntu /bin/bash
root@04fe75de21d4:/# touch TESTFILE
root@04fe75de21d4:/# ls
TESTFILE  boot	etc   lib    media  opt   root	sbin  sys  usr
bin	  dev	home  lib64  mnt    proc  run	srv   tmp  var
In the terminal above, I created a file called TESTFILE. We will try to open a second terminal and check to see the file from it.
To use xsenter we need the process ID of the container. Unfortunately we can’t use ps aux but rather have to use docker’s inspect command. I open a new terminal and type the below
If I now create a file inside /home/manos/myproject the change will be reflected from inside the container and vice versa. Play a bit with it by creating and deleting files from either the host or from inside the container to see for yourself.
Create a user in the container
It is wise to have a normal user in your image. If you don’t then you should create one and save the image. That way the source files can be opened from a normal user on your host – you won’t need to launch your IDE with root privileges.
> adduser manos
..
Follow the instructions and then commit your image. That way whenever you load the image again, you will be having user manos. To change to user manos just type
> su manos
All files you create now, will be accesible by a normal user at the host machine. Something else you could do is to somehow
Real life scenario: Python, Django and virtualenv
I wanted to learn Django. Installing Django is commonly made with the package manager pip, but pip has a bad history of breaking up things since it doesn’t communicate with Debian’s apt. So at some point if you installed/uninstalled python stuff with apt, pip wouldn’t know about it and vice versa. In the end you would end up with a broken python environment. That’s why a tool called virtualenv is being used – a tool that provides isolation. Since we have docker though which also provides isolation we can simply use that.
So what I really want:
Have the source code on my host.
Run django and python inside a container.
Debug from at least two terminals.
Visually my setup looks as something like this:
I assume you have an image with django and python installed. Let’s call the image py3django.
Firstly create the folder where you want your project source code to be. This is the folder that we will mount. My project resides in /home/manos/django_projects/myblog for example.
Once it’s created I just run bash on the image py3django. This will be my primary terminal (terminal 1):
The flag -p makes sure that docker doesn’t choose a random port for us. Since we run Django we will want to run a web server with a fixed port (on 8000). The flag -v mounts our host folder /home/manos/django_projects/myblog to the container’s folder /home/myblog. py3django is the image I have.
Now we have a folder where we can put our source code and a working terminal to play with. I want though a second terminal (terminal 2) to run my python webserver. So I open a second terminal and type:
Mind that I had to put the appropriate container ID in the command above.
Now all this is very nice but admittedly it’s very complex and it will be impossible to remember all these commands and boring to type them each single day. Therefore I suggest you create a BASH script that initiates the whole thing.
For me it took a whole day to come up with the script below:
#! /bin/bash

django_project_path="/home/manos/django_projects/netmag" # Path to project on host
image="pithikos/py3django_netmag_rmved"                  # Image to run containers on

echo "-------------------------------------------------"
echo "Project:  $django_project_path"
echo "Image  :  $image"


# 1. Start the container in a second terminal
proj_name=`basename $django_project_path`
old_container=`docker ps -n=1 -q`
export docker_line="docker run -i -t -p 8000:8000 -v $django_project_path:/home/$proj_name $image /bin/bash"
export return_code_file="$proj_name"_temp
rm -f "$return_code_file"
gnome-terminal -x bash -c '$docker_line; echo $? > $return_code_file'
sleep 1
if [ -f "$return_code_file" ] && [ 0 != "$(cat $return_code_file)" ]
then
	echo
	echo "--> ERROR: Could not load new container."
	echo "    Stop any other instances of this container"
	echo "    if they are running and try again."
	echo
	echo "    To reproduce the error, run the below:"
	echo "    $docker_line"
	echo
	rm -f "$return_code_file"
	exit 1
fi
rm -f "$return_code_file"


# 2. Connect to the new container
while [ "$old_container" == "`docker ps -n=1 -q`" ]; do
	sleep 0.2
done
container_ID=`docker ps -n=1 -q`
sudo nsenter --target $(docker inspect --format {{.State.Pid}} $container_ID) --mount --uts --ipc --net --pid
This script starts a container on a second terminal and then connects to the container from the current terminal. If starting the container fails, an appropriate message is given. django_project_path is the full path to the folder on the host with the source code. The variable image holds the name of the image to be used.
You can combine this with devilspie, an other nice tool that automates the position and size of windows when they’re launched.
In case you wonder about the top window with all the containers, that’s simply a watch command, a tool that updates regularly a command. In my case I use watch with docker ps. Simple stuff:
> watch docker ps
I use this because I personally like having an overview on the running containers. That way I don’t end up with trillions of forgotten containers that eat up my system.
Now that you have everything setup you can also run django server from one of the two terminals or whatever else you might want.
So as an intern in a big company I was given the task to get comfortable with docker. The problem is that docker is quite fresh so there isn’t really that much of good tutorials out there. After reading a bunch of articles and sparse tutorials (even taken the official tutorial at https://www.docker.com/tryit), I still straggled to get a firm grip on what docker even is supposed to be used for. Therefore I decided to make this tutorial for a total beginner like me.
Docker vs VirtualBox
There are many different explanations on the internet about what docker is and when to use it. Most of them however tend to complicate things more than giving some practical information for a total beginner.
Docker simply put is a replacement for virtual machines. I will use virtual box as a comparison example since it’s very easy for anyone to download and try to see the differences themselves.
The application VirtualBox is essentially a virtual machine manager.
Each and every of the OSes you see in the picture above, is an installed virtual machines. Each such machine has it’s own installed OS, kernel, virtual devices like hard disks, network cards etc. All this takes a considerate amount of memory and needs extra processing power. All virtual machines (VM) like VMware, Parallels, behave the same.
Now imagine that we want to use nmap from an OpenSUSE machine but we are on an Ubuntu. Using VirtualBox we would have to install the whole OS and then run it as a virtual machine. The memory consumption is humongous for such a trivial task.
In contrast to VirtualBox or any other virtual machine, Docker doesn’t install the whole OS. Instead it uses the kernel and hardware of our primary computer (the host). This makes Docker to virtualize super fast and consume only a fraction of the memory we would else need. See the benefits? Imagine if we wanted to run 4 different programs on 4 different OSes. That would take at a minimum 2GB of RAM.
But why would you want to run nmap on openSUSE instead of the host computer? Well this was just a silly example. There are other examples that prove the importance of a tool like Docker. Imagine that you’re a developer and you want to test your program on 10 different distributions for example. Or maybe you are the server administrator on a company and just updated your web server but the update broke something. No problem, you can run your web server virtualized on the older system version. Or maybe you want to run a web service in a quarantine for security reasons. As you see there are loads of different uses.
One question might rise though: how do we separate each “virtual machine” from the rest of the stuff on our computer? Docker solves this with different kernel (and non-kernel) mechanisms. We don’t have to bother about them though, since Docker takes hands of everything for us. That’s the beauty of it afterall: simplicity.
Install docker
Docker is in the ubuntu repositories (Ubuntu 14.04 here) so it’s as straightforward as: sudo apt-get install docker
Once installed, a daemon (service) of the docker will be running. You can check that with
sudo service docker.io status
The daemon is called docker.io as you might have noticed. The client that we willuse is simply called docker. Pay attention to this tiny but significant detail.
Configuration
Do these two things before using docker to avoid any annoying warnings and problems.
Firstly we need to add ourselves to the docker group. This will let us to use docker without having to use sudo every time:
sudo adduser <your username here> docker
Log out and then in.
Secondly we will edit the daemon configuration to ensure that it doesn’t use any local DNS servers (like 127.0.0.1). Use your favourite editor to edit the /etc/default/docker.io file. Uncomment the line with DOCKER_OPTS. The result file looks like this for me:
# Docker Upstart and SysVinit configuration file

# Customize location of Docker binary (especially for development testing).
#DOCKER="/usr/local/bin/docker"

# Use DOCKER_OPTS to modify the daemon startup options.
DOCKER_OPTS="-dns 8.8.8.8 -dns 8.8.4.4"

# If you need Docker to use an HTTP proxy, it can also be specified here.
#export http_proxy="http://127.0.0.1:3128/"

# This is also a handy place to tweak where Docker's temporary files go.
#export TMPDIR="/mnt/bigdrive/docker-tmp"
We need to restart the daemon for the change to take effect:
sudo service docker.io restart
Get an image to start with
In our scenario we want to virtualize an Arch machine. On VirtualBox, we would download the Arch .iso file and go through the installation process. In Docker we download a “fixed” image from a central server. There are thousands of different such image files. You can even upload your own image as you will see later.
This will download a default image for Arch Linux. “base/arch” is the identifier for the Arch Linux image.
To see a list of all the images locally stored on your computer type
> docker images
REPOSITORY            TAG                   IMAGE ID            CREATED             VIRTUAL SIZE
base/arch             2014.04.01            a64697d71089        12 weeks ago        277.1 MB
base/arch             latest                a64697d71089        12 weeks ago        277.1 MB
Starting processes with docker
Once we have an image, we can start doing things in it as if it was a virtual machine. The most common thing is to run bash in it:
> docker run -i -t base/arch bash
[root@8109626c57f5 /]#
See how the command prompt changed? Now we are inside the image (virtual machine) running a bash instance. In docker jargon we are actually inside a container. The string 8109626c57f5 is the ID of the container. You don’t need to know much about that now. Just pay attention to how we acquired that ID, you will need it.
Let’s do some changes. Firstly I want to install nmap. Since pacman is the default package manager in Arch, I will use that:
> nmap www.google.com
Starting Nmap 6.46 ( http://nmap.org ) at 2014-07-18 13:33 UTC
Nmap scan report for www.google.com (173.194.34.116)
Host is up (0.00097s latency).
..
It seems we installed it successfully! Let’s also create a file:
[root@8109626c57f5 /]# touch TESTFILE
So now we have installed nmap and created a file in this image. Let’s exit the bash
[root@8109626c57f5 /]# exit
exit
>
In VirtualBox you can save the state of the virtual machine at any time and load it later. The same is possible with docker. For this I will need the ID of the container that I was using. In our case that is 8109626c57f5 (it was written in the terminal prompt all the time). In case you don’t remember the ID or you have many different containers, you can list all the containers:
> docker ps -a
CONTAINER ID     IMAGE                    COMMAND      CREATED            STATUS
8109626c57f5     base/arch:2014.04.01     bash         25 minutes ago     Exit 0
Let’s save the current state to a new image called mynewimage:
> docker commit -m "Installed nmap and created a file" 8109626c57f5 mynewimage
6bf56047833bd41c43c9fc3073424f37bfbc96993b65b868cb8d6a336ac28b0b
Now we have the saved image locally on our computer. We can load it anytime we want to come back to this state. And the demonstration..
> docker run -i -t mynewimage bash
[root@55c343f1643a /]# ls
TESTFILE  bin  boot  dev  etc  home  lib  lib64  mnt  opt  proc  root  run  sbin  srv  sys  tmp  usr  var
[root@55c343f1643a /]# whereis nmap
nmap: /usr/bin/nmap /usr/share/nmap /usr/share/man/man1/nmap.1.gz
Loading the image on an other computer
We now have two images, the initial Arch image we started with and the new image that we saved:
> docker images
REPOSITORY            TAG                   IMAGE ID            CREATED             VIRTUAL SIZE
mynewimage            latest                6bf56047833b        2 hours ago         305.8 MB
base/arch             2014.04.01            a64697d71089        12 weeks ago        277.1 MB
base/arch             latest                a64697d71089        12 weeks ago        277.1 MB
It’s time to load the new image on a totally different computer. First I need to save the image on a server though. Luckily for a docker user, this is very simple. First you need to make an account at https://hub.docker.com/
Once that is done we need to upload the image to the hub. However we have to save the image in a specific format, namely username/whatever.
Let's save the image following that rule:
> docker commit -m "Installed nmap and created a file" 8109626c57f5 pithikos/mynewimage
12079e0719ce517ec7687b4bf225381b99b880510cda3bc1e587ba1da067bd3b
> docker push pithikos/mynewimage
The push refers to a repository [pithikos/mynewimage] (len: 1)
Sending image list
..
Once everything is uploaded, we can pull it from anywhere just as we did when we first pulled the Arch image.
I will do that from inside an OpenSUSE install on a totally different machine. First I try to run nmap
As you see it’s not installed on the computer. Let’s load our Arch image that we installed nmap on
Once the download of the image is complete we will run a bash on it just to look around:
As you see, the TESTFILE is in there and we can run nmap. We are running the same Arch I ran earlier on Ubuntu, on a totally new machine with a totally different OS, but still running it as an Arch.
A bit on containers
Now you probably got a good idea on what images are. Images are simply states of a “virtual machine”.
When we use docker run whatever we are running is put inside a container. A container is pretty much a Linux concept that arose recently with the recent addition of Linux containers to the kernel. In practise container is running a process (or group of processes) in isolation from the rest of the system. This makes the process in the container to not being able to have access to other processes or devices.
Every time we run a process with Docker, we are creating a new container.
> docker run ubuntu ping www.google.com
PING www.google.com (64.15.115.20) 56(84) bytes of data.
64 bytes from cache.google.com (64.15.115.20): icmp_seq=1 ttl=49 time=11.4 ms
64 bytes from cache.google.com (64.15.115.20): icmp_seq=2 ttl=49 time=11.3 ms
^C
> docker run ubuntu ping www.yahoo.com
PING ds-any-fp3-real.wa1.b.yahoo.com (46.228.47.114) 56(84) bytes of data.
64 bytes from ir2.fp.vip.ir2.yahoo.com (46.228.47.114): icmp_seq=1 ttl=45 time=46.5 ms
64 bytes from ir2.fp.vip.ir2.yahoo.com (46.228.47.114): icmp_seq=2 ttl=45 time=46.1 ms
^C
Here I ran two instances of the ping command. First I pinged http://www.google.com and then http://www.yahoo.com. I had to stop them both with CTRL-Z to get back to the terminal.
> docker ps -a | head
CONTAINER ID      IMAGE             COMMAND                CREATED              STATUS
7c44887b2b1c      ubuntu:14.04      ping www.yahoo.com     About a minute ago   Exit 0
72d1ca1b42c9      ubuntu:14.04      ping www.google.com    7 minutes ago        Exit 0
As you see, each command got its own container ID. We can further analyse the two containers with the inspect command. Below I compare the two different ping commands I ran to make it more apparent how the differentiate in the two containers:
Notice that I don’t have to write the whole string. For example instead of 7c44887b2b1c, I just type the first three letters 7c4. In most cases this will suffice.
On this tutorial I will explain how to install and configure Postfix to be able and receive emails from the Internet and LAN. Running Postfix at home allows you to have an email that looks as you wish. If you have the website mywebsite.com then you can have emails like support@mywebsite.com, admin@mywebsite.com etc.
I set-up Postfix in a gradual way:
First I set up a LAN mail server
Then I configure the mail server to accept emails from the Internet
Lastly I configure the mail server to allow outgoing emails to the Internet
Starting with a LAN mail server
I start by setting up a mail server that works for the LAN. My LAN network looks as below.
ubuntux and laptop are the hostnames (names) of the computers that can be used to identify them in the LAN. For example if you want to ping ubuntux you don’t have to know its IP. You can just ping the computer by providing its hostname. Keep in mind that hostnames cannot be seen outside the LAN.
If you don’t know the hostname of your computer you can run in the terminal the command hostname. Throughout the tutorial I will be using ubuntux as my main computer where I install Postfix.
The router has an external IP 20.20.20.20 and an internal 192.168.1.1. Simply put, that means that from the internet our network is seen as 20.20.20.20 while the computers in the LAN sees the router having the IP 192.168.1.1.
Let’s install Postfix:
sudo apt-get install postfix
The install will ask you some questions. Just use the default values. After install, the daemon is launched automatically so we can start sending emails.
Sending the first email in the LAN
If you haven’t read my article on sending emails via telnet, you could check it out. In that article I describe how you can use telnet to send emails via a gmail mail server.
To send our emails we will be using telnet like in that article. The only difference is that while we had to authenticate with the gmail server with a login/password, here we won’t. The reason is that our mail server is in the LAN and by default configuration users in LAN are considered trusted.
The reason I use telnet and not an email client like Outlook Express is that I want you to see what is actually happening low-level and to get an in insight into the SMTP protocol.
First I send an email from ubuntux (192.168.1.2):
>telnet localhost 25
Trying 127.0.0.1...
Connected to localhost.
Escape character is '^]'.
220 ubuntux.localdomain ESMTP Postfix (Ubuntu)
HELO whatever
250 ubuntux.localdomain
MAIL FROM: whatever
250 2.1.0 Ok
RCPT TO: animal@localhost
250 2.1.5 Ok
data
354 End data with .
This is a test
.
250 2.0.0 Ok: queued as 22AEA133C91
quit
221 2.0.0 Bye
In the telnet session I sent an email to animal@localhost. We assume that animal is the user I am logged in as at the moment. Then I can just type mail in the terminal and I will see the email arrived. Typing the number of the email I can read it. Typing ‘q’ will quit the application. All emails can be found in their raw format at /var/spool/mail.
Let’s try and send an email from the second machine (192.168.1.10):
>telnet 192.168.1.2 25
Trying 192.168.1.2...
Connected to 192.168.1.2.
220 ubuntux.localdomain ESMTP Postfix (Ubuntu)
HELO whatever
250 ubuntux.localdomain
MAIL FROM: whatever
250 2.1.0 Ok
RCPT TO: animal@ubuntux
250 2.1.5 Ok
data
354 End data with .
Sending from my laptop.
.
250 2.0.0 Ok: queued as 68DF4133C91
quit
221 2.0.0 Bye
The only difference here is that we connected to ubuntux instead of localhost. Accordingly we had to change the recipient from animal@localhost to animal@ubuntux.
The recipient after “RCPT TO:” can essentially be any user (existing or not) as long as the domain used in the email is the hostname of our mail server (ubuntux in this case). An email with a different domain could be for example animal@randomdomain. The email with such a recipient would get totally discarded from the server and lost.
Taking it a step further – receiving emails from the Internet
At this state, emails can be delivered to the mail server from users in the LAN. We will try and make the mail server to be able and receive emails from the internet as well.
In the illustration above an email is being sent from the gmail server to our own mail server. We don’t care how the email got to the gmail mail server. What we care about is how the email will reach our mail server. For the correct routing of the email we have to configure three things:
Our DNS server
Our router
Our mail server
Configuring DNS
Every time we visit a website, a DNS request has to be made to find out the IP of that website. In the same fashion a DNS request is made by the mail server when an email is to be sent. This request is somehow different, in that it looks for a very specific record; an MX (mail exchange) record.
(1) As seen in the illustration the mail server looks at the domain after the ‘@’ symbol in the recipient of the email.
(2) It then sends a DNS request for the mail server in that domain (linuxmeerkat.com). To get an idea of what the answer of such a request can be you can use the debugging tool dig and test it with dig MX linuxmeerkat.com.
(3) A reply arrives from the DNS server with the IP of the mail server.
(4) The email is forwarded to that IP, and further to the mail server.
Now ideally the MX record in the DNS server would look like this:
linuxmeerkat.com. IN MX 10 20.20.20.20
That is however breaking the standard and therefore it is unacceptable. By defition an MX record should bind a domain to a hostname (or more). Therefore we need to replace the IP in the above example with a hostname:
linuxmeerkat.com.	IN	MX	10	mail.linuxmeerkat.com.
mail	IN	A	20.20.20.20
Since the mail.linuxmeerkat.com hostname (or FQDN to be exact) doesn’t exist, we have to create it with an A record. An A record binds a (made up) hostname to an IP by definition. Since our server is behind the router I use the IP of the router instead (the IP should never be a LAN one). For hostname I use mail but you could use whatever you wish. Just keep in mind that if you change it, the hostname must also be reflected in the MX record – you should also change the FQDN.
Keep in mind that if you do changes to the DNS records, it might take some time for the effects to take place. So continue a bit later, or after a day or two depending on how fast the changes are updated (essentially it depends on the TTL values).
Is your network reachable from outside?
Time to test if the DNS configuration works.
When we ping mail.linuxmeerkat.com we want that it pings 20.20.20.20. So let’s test it. Go to http://ping.eu/ping/ and ping your mail server’s FQDN (in this case mail.linuxmeerkat.com). It’s important that you ping from outside your LAN so that no local cache is used.
If you don’t get a response, try pinging directly your WAN IP (20.20.20.20). If you still don’t get a response, then probably your router is blocking ping from outside. If you are getting a response by pinging the IP but not when you ping the hostname, then you haven’t configured your DNS records correctly or they haven’t taken effect yet.
If you run your own DNS server you can check for warnings and errors in /var/log/syslog.
Configure your router
At this point we know that an email can arrive as far as to the router. We only need to configure the router so it forwards the email to the correct machine in the LAN.
Since we know that mail servers use port 25 and if we haven’t changed that, then our mail server also uses port 25, we just have to configure the NAT of our router.
Forward all TCP at port 25 to your mail server (in my case 192.168.1.2). My router’s port forwarding looks as below:
Sending an email to Postfix from gmail
If we can ping the mail server from the internet, then we can assume that our network is reachable. Sending an email to animal@mail.linuxmeerkat.com will not work still though as the router won’t know to which computer in the LAN to forward the email to. Setting the NAT of the router to forward all incoming TCP connections on port 25 to the mail server fixes this.
We can now test it by sending an email to animal@mail.linuxmeerkat.com from a gmail account. The mail server will reply with an error:
Delivery to the following recipient failed permanently:

     animal@mail.linuxmeerkat.com

Technical details of permanent failure:
Google tried to deliver your message, but it was rejected by the server for the recipient domain mail.linuxmeerkat.com by mail.linuxmeerkat.com. [20.20.20.20].
The reason the email gets rejected lies in the Postfix configuration. The configuration file /etc/postfix/main.cf has this (or a similar) line:
mydestination = ubuntux, localhost
mydestination is the variable that defines what FQDN/domains in emails are accepted. In essence all emails arrive at the server, it’s just the depending on this configuration some of these emailes will be discarded and some will be accepted by the server.
With the current configuration we can see that only emails of the format username@megistanas and username@localhost are accepted. Trying to send an email to animal@ubuntux from gmail won’t work as ubuntux just can’t be seen from outside our LAN; it doesn’t resolve to anything. For this reason we want to add one ore more domains that point towards our network. That way, when the an email arrives it doesn’t get rejected.
In my case I add linuxmeerkat.com so that I accept all emails with the format username@linuxmeerkat.com:
mydestination = linuxmeerkat.com, ubuntux, localhost
Restart Postfix and sending an email to animal@linuxmeerkat.com should now work.
You could essentially also add mail.linuxmeerkat.com as that would take the same route as well. We can add pretty much any domain that points to our router.
Sending an email to gmail or hotmail from Postfix
There are essentially two entries in the configuration file that we have to change to make sending emails to the Internet possible:
smtpd_sender_restrictions can have more options than the one shown. However the only interesting option for us at the moment is to permit anyone from mynetworks to be able and send emails. So make sure permit_mynetworks is amongst the options.
mynetworks specifies local networks where users are considered trusted to use our mail server. For that we have added the 192.168.0.0/16 which includes all computers in the network. Be careful, you don’t want to have a WAN ip here as that would make our mail server an open relay (I talk more about that below).
This configuration will let anyone from our computer to send an email of the format username@linuxmeerkat.com. If we want users of the LAN to be able to use our mail server from the Internet, some sort of authentication has to take place (login or key), but I am will not go further into that.
Let’s test and see if we can send an email to a gmail account:
>telnet mail.linuxmeerkat.com 25
220 mail.linuxmeerkat.com ESMTP Postfix (Ubuntu)
HELO dickhead
250 mail.linuxmeerkat.com
MAIL FROM: animal@mail.linuxmeerkat.com
250 2.1.0 Ok
RCPT TO: animal@gmail.com
250 2.1.5 Ok
DATA
354 End data with <CR><LF>.<CR><LF>
This is a test.
.
250 2.0.0 Ok: queued as 3D31311F765
quit
221 2.0.0 Bye
If everything went as planned, you should have received an email in your gmail account (animal@gmail.com in the example).
Make sure your mail server is not an open relay
You always want to avoid having an open relay. An open relay constitutes that your mail server can be used by anyone on the internet including spammers.
Once spammers find out that your server is an open relay, they will start using it. At some point, an other mail server will find out that you have an open relay and will blacklist your server.
So how do you ensure that you don’t have an open relay? Very simply. In your configuration file pay attention to these two lines:
As long as the networks in mynetworks are LAN IPs and not WAN IPs, your mail server is not an open relay as no-one outside the LAN can use your mail server to send emails.
Our mail server works fine at the moment but it’s very minimal. It doesn’t even filter incoming spam emails. Configuring filters etc. can be time consuming and will need further maintenance all the time. An easy solution to this is to forward our emails to a second mail server, a relay server (keep in mind: not same as an open relay, as a relay server is not open to everyone). So if we have to deliver an email to user11@gmail.com, instead of delivering to the gmail server directly, we can use a second mail server which we have access to. That server can then do the filtering etc. for us and deliver the email to its final destination.
My ISP is called Bahnhof and by googling around I found that it offers a relay at mail2.bahnhof.se. Most ISPs do offer mail servers that can be used as relays. Luckily for me, I don’t even need to enter a password and username as I am authenticated by my IP or MAC (depends on how you’re connected to the ISP). In your case you might need to authenticate first before using the relay. I won’t go into how you do that. I will however tell you how you can test to see if you can use the relay as a relay server.
If you can send an email directly from the relay server then you can use it as your relay. See the telnet session below:
telnet mail2.bahnhof.se 25
Connected to mail2.bahnhof.se.
Escape character is '^]'.
220 mxf3.bahnhof.se ESMTP
HELO dickhead
250 mxf3.bahnhof.se
MAIL FROM: animal@linuxmeerkat.com
250 Ok
RCPT TO: animal@gmail.com
250 Ok
DATA
354 End data with <CR><LF>.<CR><LF>
This is a test.
.
250 Ok: queued as 0C67C53CEB7
QUIT
221 Bye
I just connected to my ISP’s mail server and sent an email to a gmail account. Since I got the email delivered and wasn’t asked for a login/password, that means that I can directly use the server as a relay without authentication.
If your ISP’s mail server requires a username and password you’ll have to do some extra work in configuring that. Also keep in mind that in the field “MAIL FROM:” you have to provide an email with a hostname that points to your network. The server will probably check to see if whatever@hostname actually resolves to your network. If not, you will get an error like below:
450 <spamotron@spammer.spam>: Sender address rejected: Domain not found
Now that we know we can use the server as a relay, we simply have to edit /etc/postfix/main.cf and make sure the relayhost is set correctly:
relayhost = mail2.bahnhof.se:25
Restart Postfix and you should be able to use your mail server as before with the difference that now all outgoing emails go first through the relay server and the relay server forwards them further to their destinations.